How to Use LinkedIn Sales Navigator in 2025: A Complete Guide
If you're in B2B sales, you’ve probably heard about LinkedIn Sales Navigator—but are you using it to its full potential? Many sales professionals sign up for the tool, explore a few features, and then struggle to see real results. Does LinkedIn Sales Navigator really work? The short answer: Yes, but only if you know how to use it effectively.
This guide will break down how to use LinkedIn Sales Navigator step by step, from setting up advanced search filters to finding decision-makers, generating leads, and integrating it with your outreach strategy. Plus, we’ll share real-world examples of how sales pros maximize Sales Navigator to close more deals faster.
How to Use LinkedIn Sales Navigator: First Steps
To begin using Sales Navigator, you need a LinkedIn account and an active Sales Navigator subscription. Here’s a step-by-step guide to get you started:
- Sign Up for Sales Navigator:
- Navigate to the LinkedIn Sales Navigator homepage.
- Choose a plan that fits your needs (Professional, Team, or Enterprise).
- Complete the signup process and link it to your LinkedIn profile.
- Set Up Your Account:
- Once logged in, set up your Sales Preferences by indicating your target industries, geographies, and job functions. This helps tailor the recommendations and searches to your specific needs.
- Build Your Sales Navigator Dashboard:
- The homepage of Sales Navigator features the Sales Navigator Dashboard where you can monitor saved leads and accounts, get real-time updates, and view recommended leads.
- Customize your dashboard to display the most relevant information for your sales strategy.
Key Features and How to Use Them
Sales Navigator is packed with features designed to streamline your prospecting process. Here are some key features and how to use them:
- Advanced Search:
- Use the Advanced Search function to filter LinkedIn members based on specific criteria such as location, industry, company size, job title, and more.
- For example, if you’re targeting tech startups in the San Francisco Bay Area, you can filter by geography and industry to find decision-makers within those companies.
- Lead and Account Recommendations:
- Based on your sales preferences and activities, Sales Navigator recommends leads (individuals) and accounts (companies) that are likely to be a good fit for your product or service.
- Continuously refine these recommendations by saving leads and accounts that align with your target profile and discarding those that don’t.
- Lead Lists and Account Lists:
- Create lists to organize and track leads and accounts. For example, you can create a list for potential clients in a specific region or industry.
- Use these lists to stay organized and focus your outreach efforts on the most promising prospects.
- InMail Messaging:
- InMail allows you to send messages directly to LinkedIn users outside of your immediate network. This is particularly useful for reaching out to potential leads.
- Write personalized InMail messages to increase your response rate. Reference the lead’s work, industry, or recent achievements to capture their attention.
- TeamLink:
- If you have a Sales Navigator Team or Enterprise plan, you can leverage TeamLink to see if any of your teammates are connected to your prospects, facilitating warm introductions.
- Alerts and Updates:
- Set up alerts to receive notifications about job changes, company news, and other updates related to your leads and accounts. This can provide timely opportunities for engagement.
How to Use LinkedIn Sales Navigator to Generate Leads
1. Setting Up Sales Navigator
Sign Up and Set Preferences:
- Subscription: Subscribe to Sales Navigator from the LinkedIn Sales Solutions page. Choose a plan that matches your needs (Professional, Team, or Enterprise).
- Preferences: Once subscribed, set up your sales preferences. These include your target industries, company sizes, geographies, and job roles. This step helps tailor the platform’s recommendations to your specific sales targets.
Example: If you’re targeting mid-sized tech companies in the U.S., set these as your preferences to receive tailored lead and account suggestions.
2. Building Your Ideal Customer Profile (ICP)
Define Your ICP:
- Demographics: Identify the key characteristics of your ideal customers, such as industry, company size, and job titles.
- Pain Points: Understand their challenges and needs that your product or service can solve.
Example: If your product is a project management tool for startups, your ICP might include founders or project managers at tech startups with 10-50 employees.
3. Advanced Search Techniques
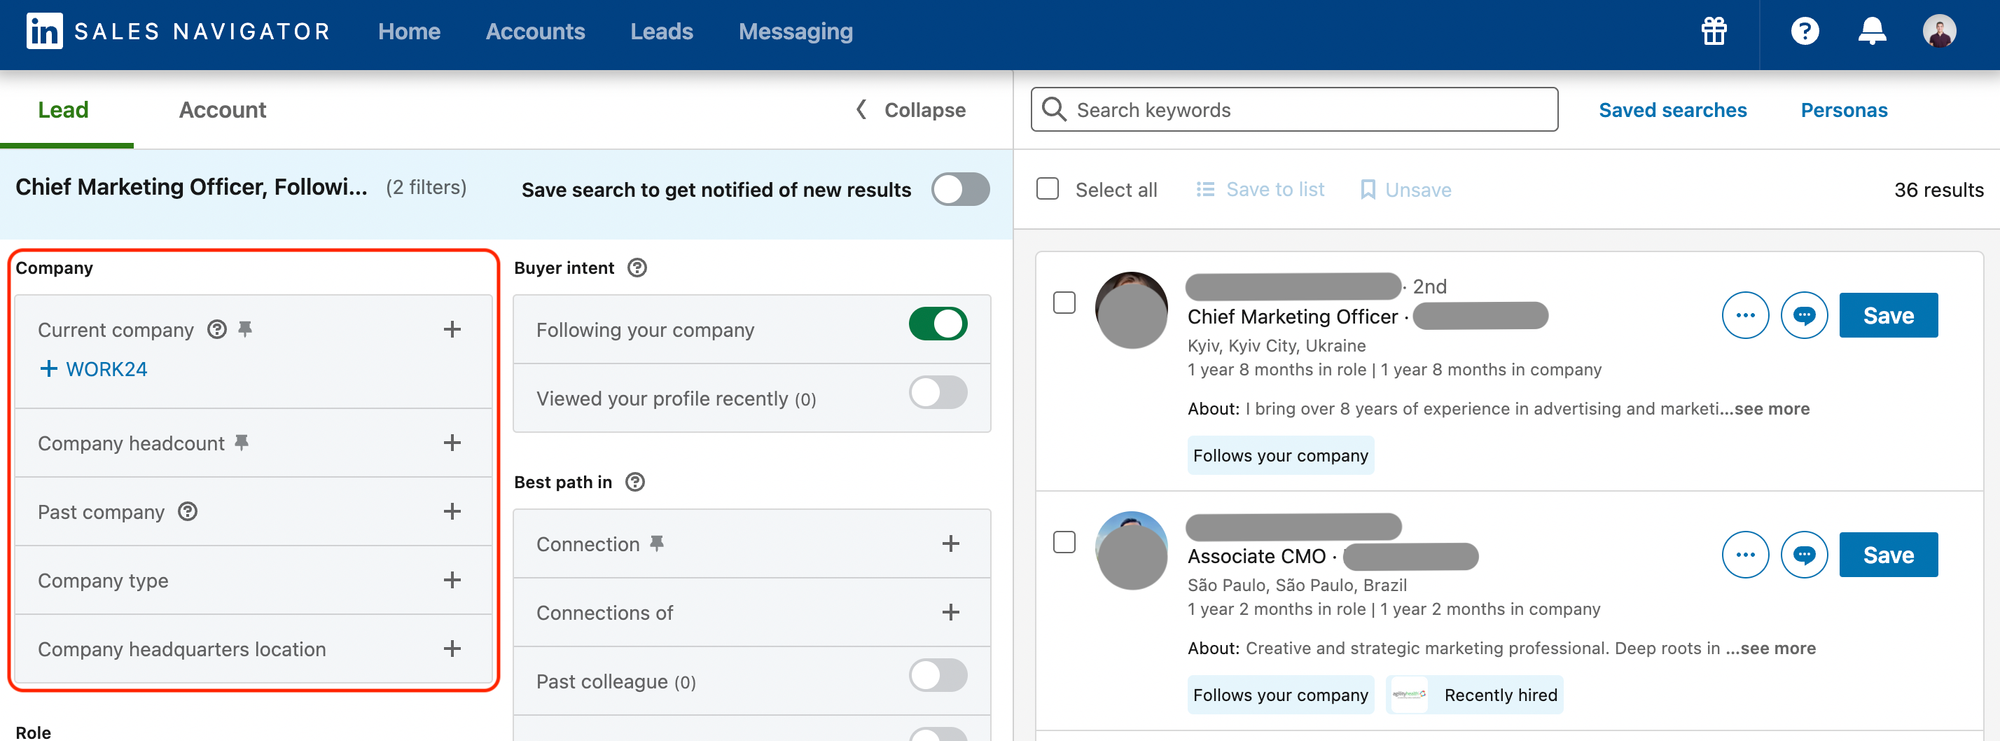
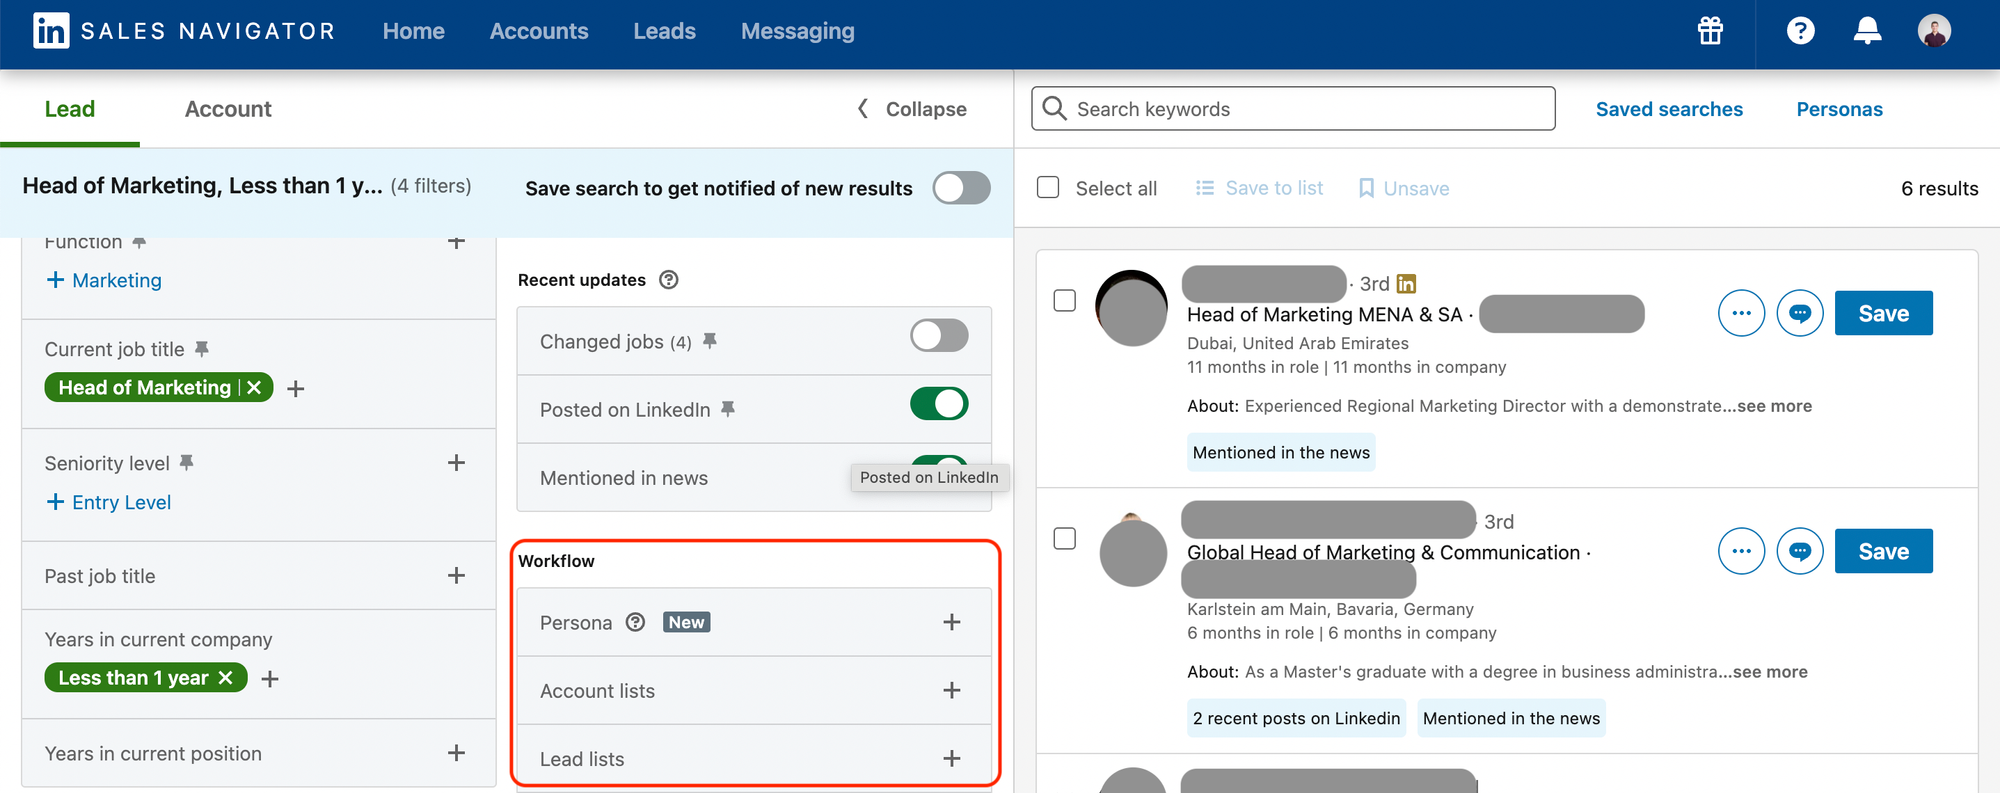
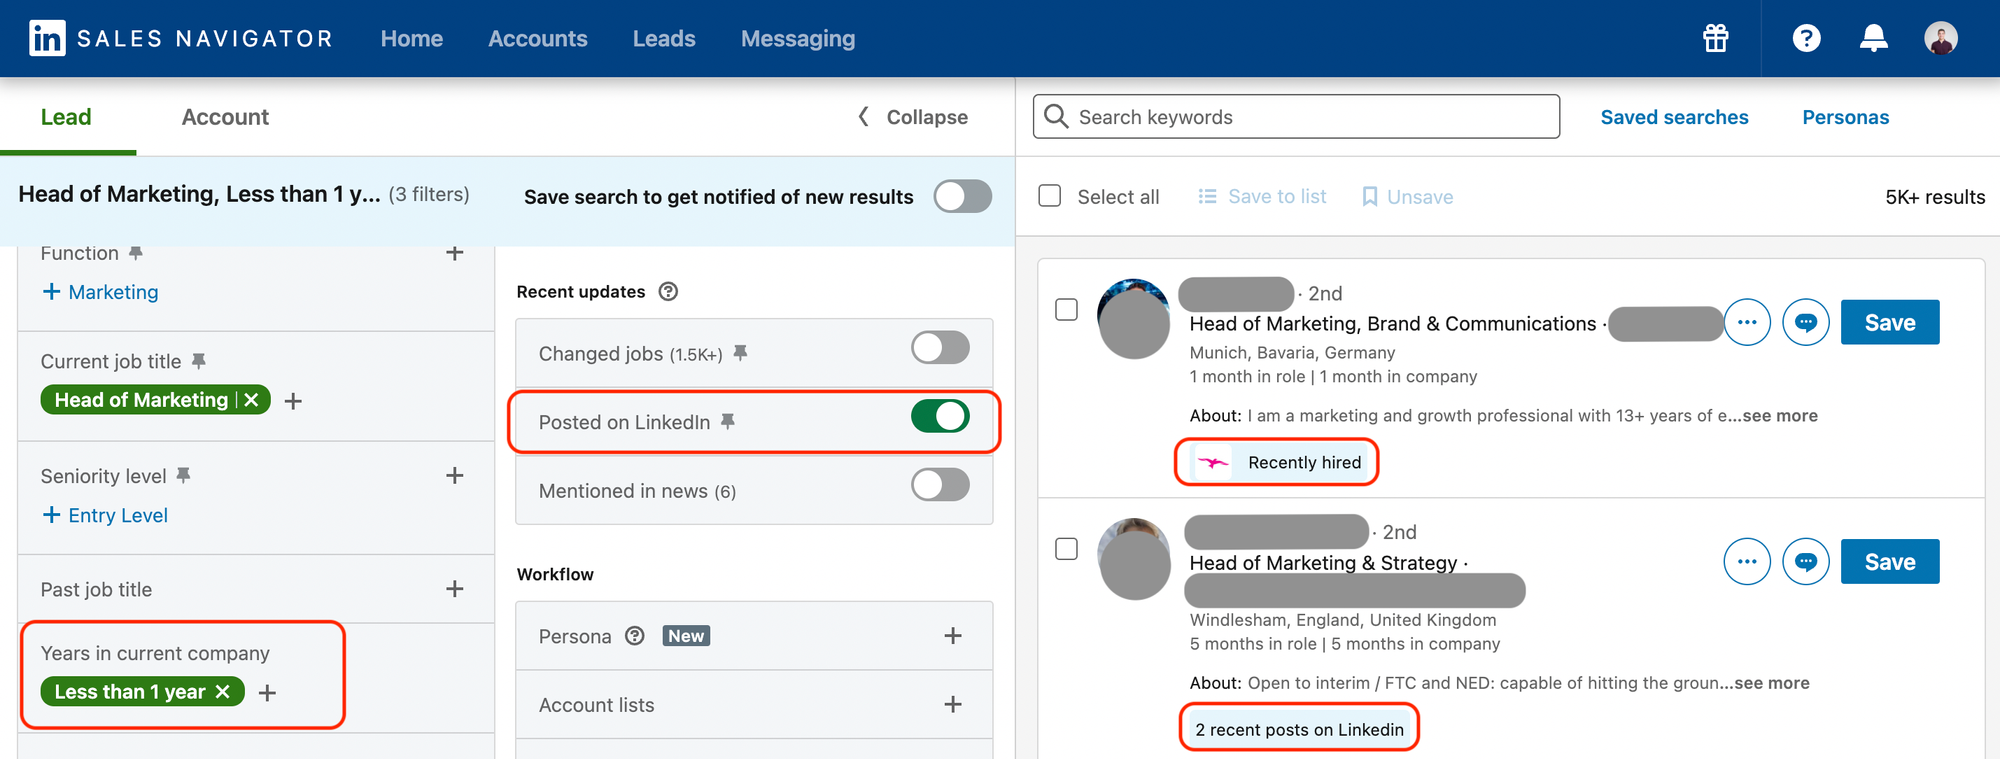
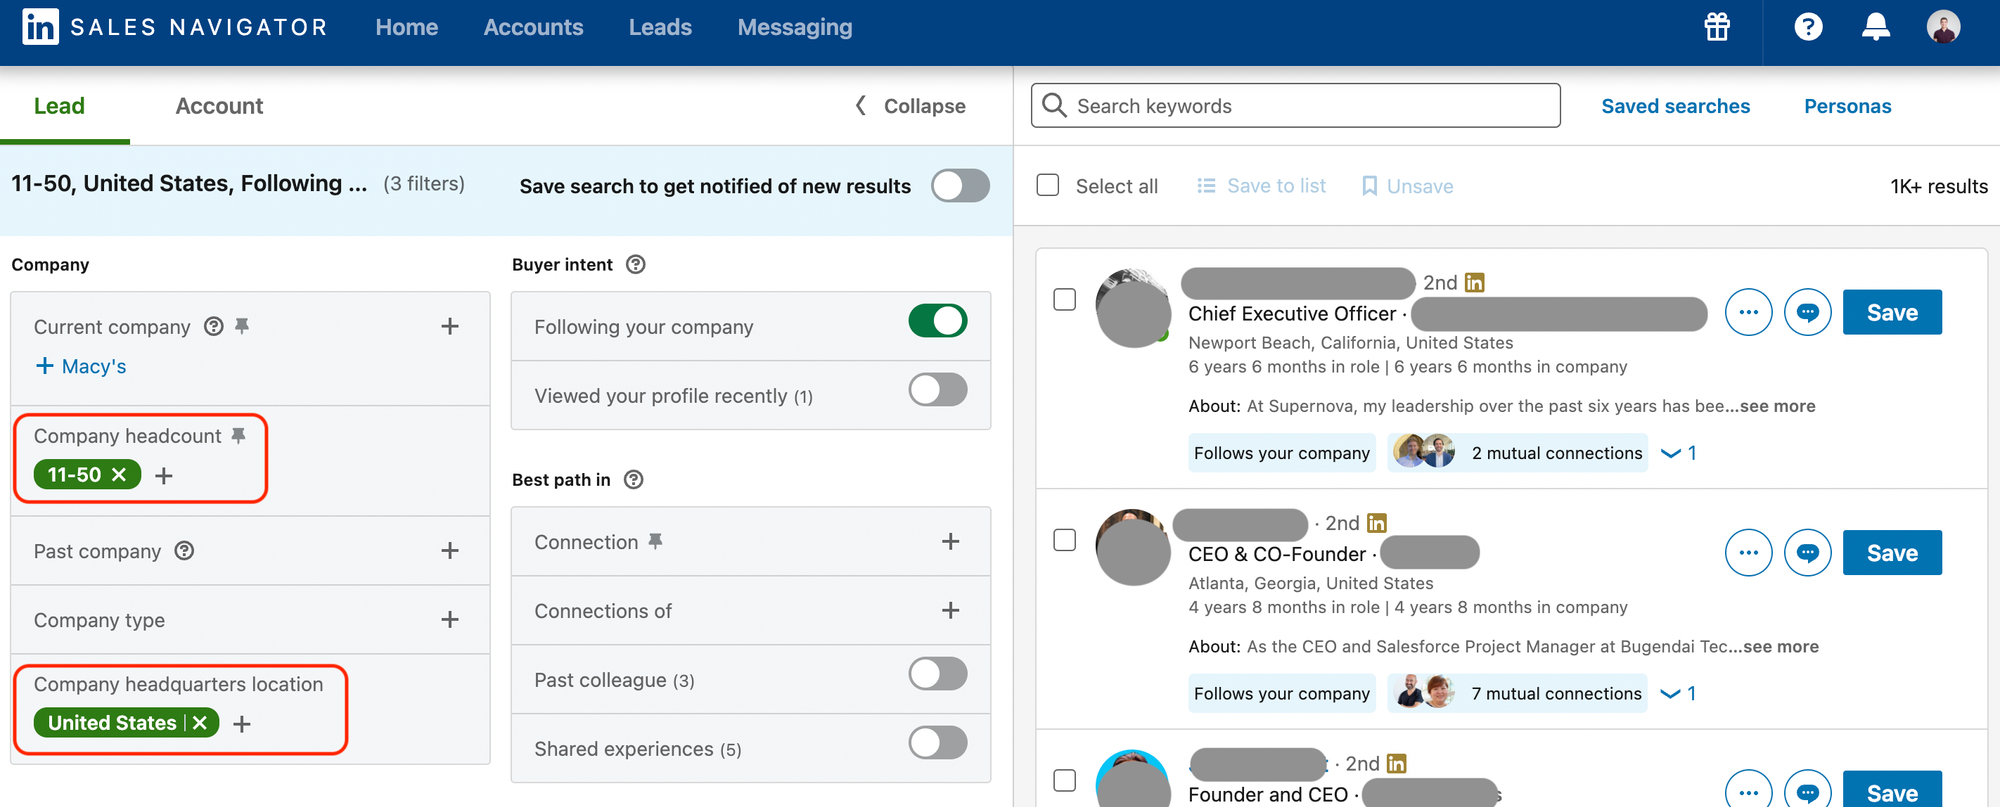
Utilize Advanced Search Filters:
- Boolean Search: Use Boolean operators (AND, OR, NOT) to refine your search criteria and combine multiple attributes.
- Filters: Apply filters such as location, industry, company size, seniority level, and more to narrow down your search to the most relevant prospects.
Example: To find marketing managers in the healthcare industry in the U.S., use the following filters:
- Title: “Marketing Manager”
- Industry: “Healthcare”
- Location: “United States”
Save Searches:
- Save your advanced search queries to quickly access and update them as needed. This ensures you’re always working with the most current data.
4. Leveraging Lead and Account Recommendations
Personalized Recommendations:
- Based on your saved leads and preferences, Sales Navigator provides personalized recommendations for new leads and accounts.
- Regularly review and update these recommendations to keep your pipeline fresh and relevant.
Example: If you’ve saved several leads from a specific tech firm, Sales Navigator might suggest other decision-makers within the same firm or similar companies.
5. Building and Managing Lead Lists
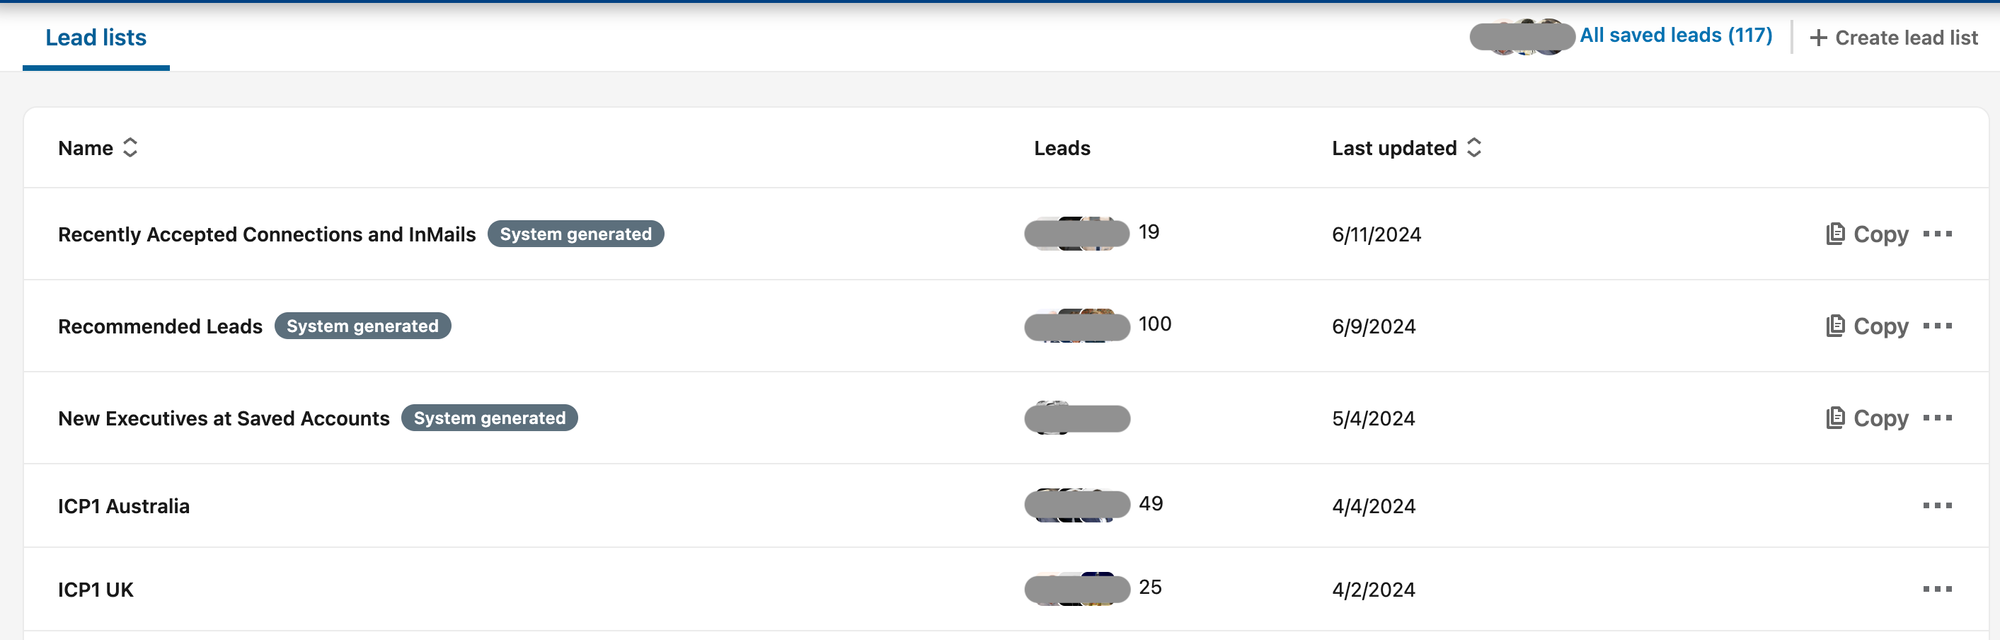
Create Lead Lists:
- Organize your leads into lists based on categories such as industry, region, or deal stage. This helps in managing your outreach efforts systematically.
- Add new leads to these lists as you discover them through searches or recommendations.
Example: Create separate lists for “Healthcare CIOs in Europe” and “Retail Marketing Managers in North America” to keep your outreach organized.
Monitor Lead Activity:
- Keep track of changes in your leads’ profiles, such as job changes, company updates, or new posts. Sales Navigator alerts you to these activities, providing timely engagement opportunities.
6. Engaging with Leads Using InMail
Personalize Your Outreach:
- Use InMail to send messages directly to leads outside your immediate LinkedIn network. Personalized InMails have a higher response rate.
- Reference something specific about their role, recent activity, or company to capture their attention.
Example: “Hi [Name], I noticed you recently posted about your company’s expansion into new markets. We specialize in solutions that can help streamline operations during growth phases. I’d love to discuss how we could support your team.”
Track and Follow Up:
- Monitor the response rates to your InMails and set reminders for follow-ups. Timely and consistent follow-ups are key to moving leads through the sales funnel.
7. Utilizing TeamLink for Warm Introductions
TeamLink Connections:
- If you’re on a Team or Enterprise plan, leverage TeamLink to see connections your teammates have with your prospects. This can facilitate warm introductions.
- Warm introductions significantly increase the likelihood of engagement compared to cold outreach.
Example: If your teammate is connected to a potential lead at a target company, ask them for an introduction to increase the chances of a successful connection.
8. Integrating with CRM and Other Tools
Sync with CRM:
- Integrate Sales Navigator with your CRM system to ensure seamless data flow and tracking. This keeps your lead information up-to-date and accessible across platforms.
- Use the CRM to track interactions, set reminders, and manage your sales pipeline efficiently.
Example: Sync your Sales Navigator lead lists with your Salesforce CRM to automatically update contact information and track communication history.
9. Analyzing and Refining Your Strategy
Analyze Performance:
- Use the insights and analytics provided by Sales Navigator to evaluate the effectiveness of your lead generation efforts.
- Adjust your search criteria, messaging, and engagement strategies based on what’s working best.
Example: If you notice higher response rates from leads in certain industries or roles, focus more of your outreach efforts on those areas.
Practical Example: Combining Sales Navigator and Skrapp for Effective Outreach
Imagine you’re a sales professional at a software company targeting mid-sized tech firms in Europe. Here’s how you could use Sales Navigator and Skrapp.io together:
- Identify Potential Leads:
- Use Sales Navigator’s Advanced Search to find leads with titles like “CTO” or “IT Director” in tech companies with 50-200 employees across Europe.
- Save these leads to a dedicated list in Sales Navigator.
- Find Email Addresses:
- Open the profiles of saved leads and use the Skrapp.io extension to find their email addresses.
- Verify and save these addresses to your Skrapp.io list.
- Engage with Personalized Outreach:
- Use the verified email list to send personalized emails highlighting how your software solution can address common challenges faced by tech firms in their growth stage.
- Refer to their specific role and company achievements to make your message stand out.
- Monitor and Follow Up:
- Keep track of interactions and set reminders for follow-ups in Sales Navigator.
- Use alerts to stay informed about changes in your leads’ roles or companies, providing new opportunities for engagement.
Using Skrapp.io with Sales Navigator
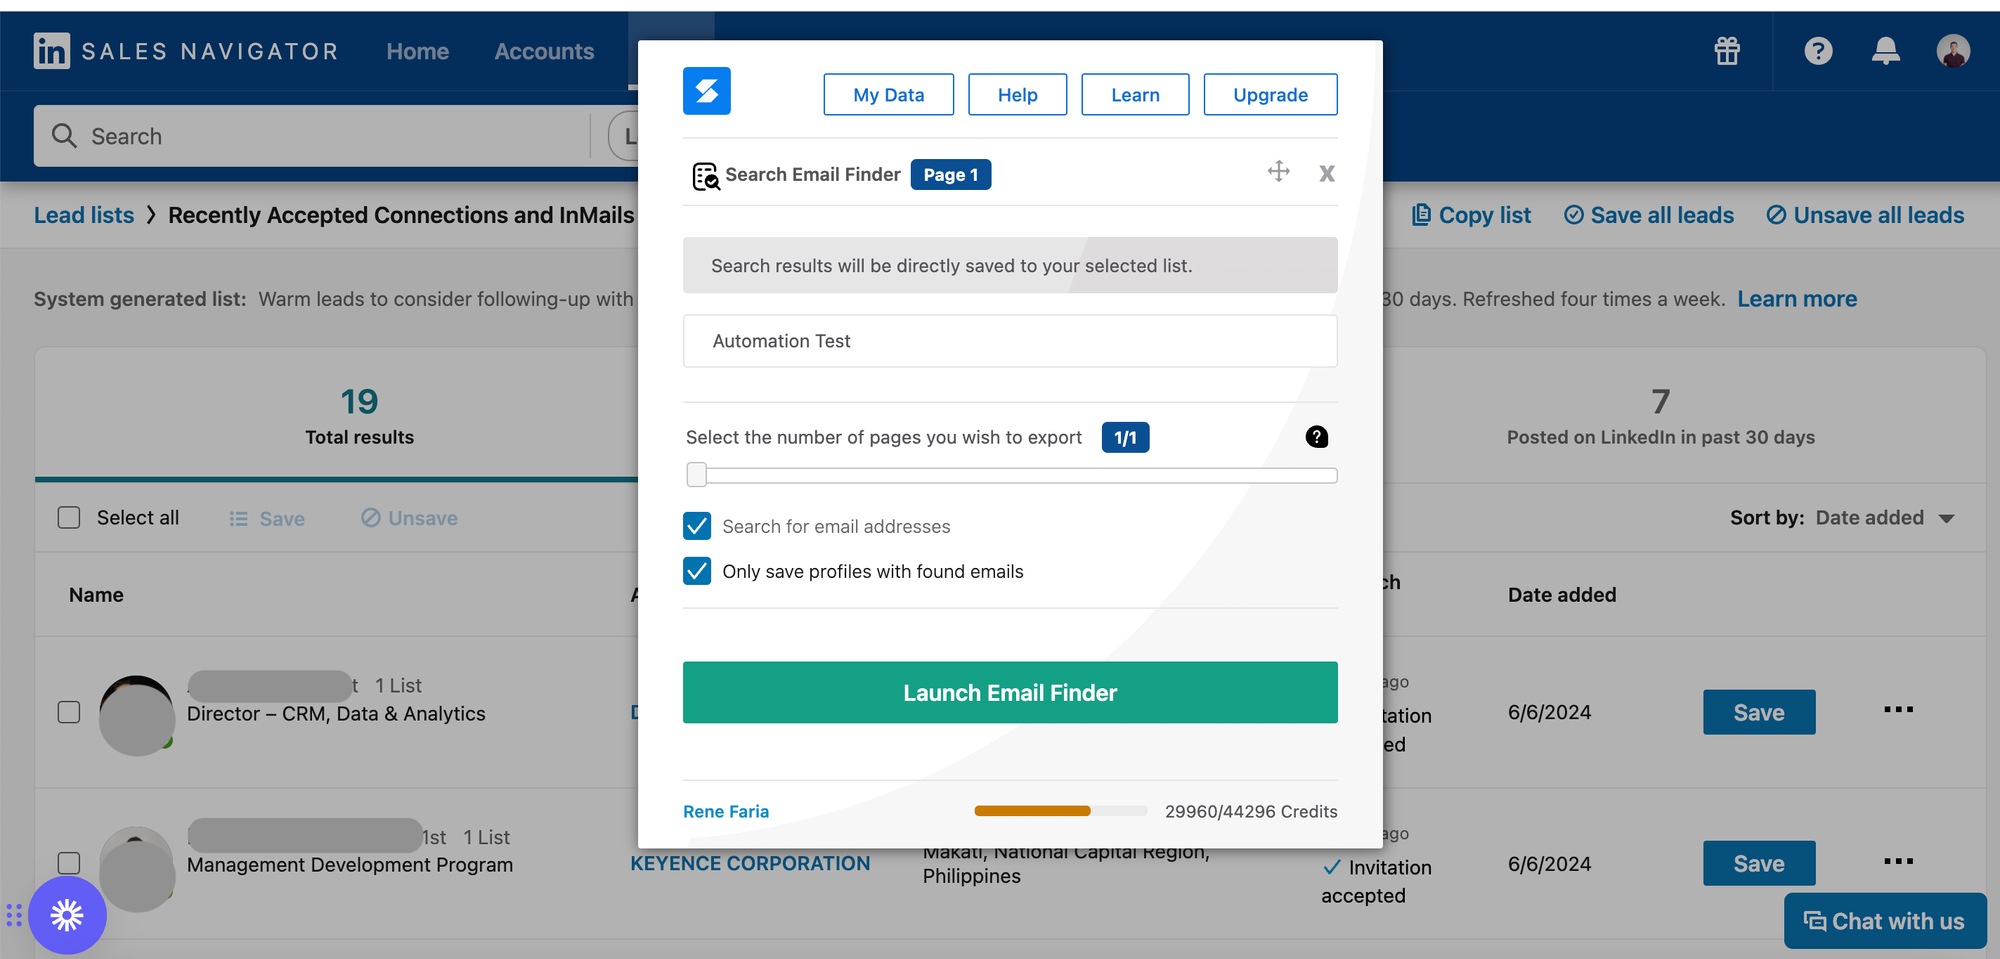
Skrapp.io is a LinkedIn email finder tool that integrates seamlessly with Sales Navigator to help you find and verify email addresses of potential leads. Here’s how to use Skrapp.io with Sales Navigator:
- Install the Skrapp.io Extension:
- Download and install the Skrapp.io browser extension available for Chrome and Firefox.
- Sign up for a Skrapp.io account and log in.
- Extracting Emails from Sales Navigator:
- While browsing LinkedIn profiles in Sales Navigator, use the Skrapp.io extension to find and save email addresses of your leads.
- Click on the Skrapp.io icon in your browser toolbar when viewing a lead’s profile. Skrapp.io will search for and display the lead’s email address.
- Building Email Lists:
- Use Skrapp.io to build lists of verified email addresses, which can be exported for use in your email marketing campaigns or CRM system.
- For example, after creating a lead list in Sales Navigator for marketing executives in the healthcare industry, you can use Skrapp.io to collect their email addresses and create a targeted email campaign.
- Verification and Export:
- Skrapp.io includes an email verification feature to ensure the addresses you collect are valid and active.
- Export your verified email lists to your CRM or email marketing platform for streamlined follow-up.
The Bottom Line
LinkedIn Sales Navigator is a powerful tool, but success depends on how strategically you use it. It’s not just about finding leads—it’s about targeting the right ones, engaging them effectively, and integrating with other tools to streamline your sales process.
To get the most out of Sales Navigator:
- Refine Your Search – Use advanced filters to build precise lead lists based on industry, job title, company growth, and location.
- Combine with Other Tools – Integrate with email finders like Skrapp.io or outreach platforms to reach leads beyond LinkedIn.
- Engage Before Pitching – Instead of cold InMails, warm up prospects by interacting with their posts and company updates.
- Track Key Signals – Monitor job changes, company news, and LinkedIn activity to reach out at the right moment.
- Leverage Automation Wisely – Export lists into CRM or email tools to automate follow-ups while keeping messages personalized.
Used correctly, Sales Navigator is more than just a lead database—it’s a sales intelligence tool that helps you connect with decision-makers, nurture relationships, and close more deals.
FAQs: How to Use LinkedIn Sales Navigator
Does LinkedIn Sales Navigator really work?
Yes, LinkedIn Sales Navigator is highly effective for B2B sales. It provides advanced search filters, lead recommendations, InMail messaging, and CRM integrations, making it easier to find and connect with decision-makers. Many sales teams use it to improve prospecting and conversion rates.
How to generate leads using LinkedIn Sales Navigator?
To generate leads with LinkedIn Sales Navigator:
- Use advanced search filters to find ideal prospects.
- Save leads and accounts to track engagement.
- Engage with prospects by interacting with their content.
- Send personalized InMail messages to start conversations.
- Sync with your CRM to manage outreach effectively.
How to get clients from LinkedIn Sales Navigator?
To turn LinkedIn Sales Navigator leads into clients:
- Research prospects before reaching out.
- Personalize messages based on their industry and interests.
- Build relationships by engaging with their posts.
- Follow up consistently and move conversations to email or calls.
How to use LinkedIn Sales Navigator for free?
LinkedIn offers a free trial of Sales Navigator, typically for 30 days. To access it:
- Go to LinkedIn Sales Navigator and sign up for the trial.
- Explore premium features like lead searches and InMail.
- Cancel before the trial ends to avoid charges or continue with a paid plan.